Monday, September 29, 2014

Tenoning Jig and Chairmakers Saw

I am happy to say I can check one more project off the list as of today. A couple of days ago I got back to work on the vise part of the tenon jig. I trimmed my ends off and added the screw part of the clamp, The hardest part was finding a way to screw the bracket on the inside of the vise, this was done using a socket wrench and a #3 screw tip fit into the socket. I could fit that into the inside and screw the bracket in with no problem. With that done I just added a single coat of oil to the vise and a little wax to the inside of the jig were the parts slide along the inside walls.
With that done today I moved onto the chair makers saw The saw consists of a blade sandwiched between to pieces of wood with a couple of handles,I used walnut for the top and maple for the bottom. In the article in Popular Woodworking the author used a saw he purchased from Lie Nielson. As  much as I would like to do that it wasn't going to happen. I went to Lowes and bought a tenon saw for less than  $20 ( I think it was $14) and disassembled it.


The blade needed to be drilled for the holes but once that was done it was just a matter of screwing it together with machine screws.


I used two handles from one of those cheep blue Stanley planes that was given to me. The last thing was to make a setup block to set the tenon marks to after they are marked, its just a piece of wood with a washer filed down so it lines up perfectly with the bottom cutting edge of the saw.


 I screwed the washer to a piece of wood then filed it down to a sharp edge so it would fit into the scribed lines for the tenon.
The set up jig lines up to the lowest part of the blade
 I did a test run with a straight joint and an angled joint and it works great.I cant wait to use this on a real project.I always seem to have trouble getting the shoulders to line up perfectly when I cut them on the table saw and cutting angled parts is even a bigger headache.


Here are a couple more shots of the clamp.

Saturday, September 6, 2014

Getting Some Freebies and Working on some UFO's

My wife is a quilter and in the quilting world they use the term UFO for "unfinished objects" or Projects. Well as things go I have several of those and I am trying my best to catch up.since my last post I did manage to do a local art show, sell a table, and meet some very nice folks.There was a couple that I was talking to and the gentleman ask me if I wanted some free wood that was cut 1/4" thick. He seen that I was doing marquetry and thought I could use it. It is not like I don't have enough odds and ends around but I said I would take it. He was a professional woodworker that works with slabs and has a lot of off cuts of some pretty nice wood. What he didn't mention was the thicker 3/4"to 1" mostly high figured and burls that he had . Below is what he gave me and I admit it was more than I expected.
Box of 1/4" thick wood pieces

  I normally work on one project at a time and then move on but since I have been working with the chevalet I end up with several marquetry projects also when I did the tea table I cut parts for two more. All this adds up to doing several of the same projects over again and getting the ambition up for that is like pulling teeth. I must admit though when I am working on them it is still enjoyable, I just want to start something totally new.

The first thing I began was refining the legs on the tea table. The finished table was fine but it just didn't look as light as the original .


I took the leg down to 5/8" from 13/16 " on the bottom and that may not seem like a lot but the difference is very noticeable I wanted one to be as close to the original as possible so I made a scratch stock and cut some flutes along the leg close to what were on the original. I'm not sure if I will add marquetry to the other one or not.


 I also started on the other three tiger pictures. This seems to be going a little better than the first one because I am assembling all three at the seem time instead of just one at a time. It is still a time consuming project but I will end up with three pictures in just a little more time than I spent doing one.


 I started with the head because its the hardest part and has most of the tiny pieces.


Another project that was started but never finished was the tenon jig. I had all the wood cut and even had a start on laying out the dovetails. 
After all the layout was done on the joints I cut the the dovetails on the table saw and chopped the pins by hand with chisels.


I made a mistake and didn't take into account the 1/2" I cut away on the inside of the tail sides and the pins stick out by that amount on both sides UGH! The only bad thing is I will lose about an inch of space on the inside of the jig for real large tenon's but I don't really work on that scale much so I don't think it will be much of an issue.I had to cut a recess on the inside of the front piece to accept the steal vise and give me a 1/2" more room.
I just glued it up as is and will cut the excess off when it is done.


The last little project was not something that was started but only took a hour or so to complete. It started when visiting my in-laws in upstate N.Y. They had a friend who lost her elderly parents recently and her father had a wood shop in the basement. She was selling the house and wanted it cleaned out . She told my father in law and me to take whatever we wanted and she didn't want anything for it. Although he had some power equipment I could have taken I didn't want to take something I didn't need just because it was free. What I did end up with was a few nice saws, one of which was a very nice backsaw, and some drill bits for a brace, and a oak shop stool.


 With all these new (old) saws I needed somewhere to store them, so along with a few I already owned I made a rack and mounted it to the wall next to my bench.
I already ordered the files to sharpen them so once sharpened I will be pretty set up for hand saws. I would like to get a 5tpi rip saw but that can wait as I do have a table saw that I don't see me getting rid of to go powerless in the near future. I will eventually have to make something for all the drill bits to keep them from being knocked around and getting dull, maybe a case for the braces and bits together.

Friday, July 25, 2014

Finishing The Tiger Chest

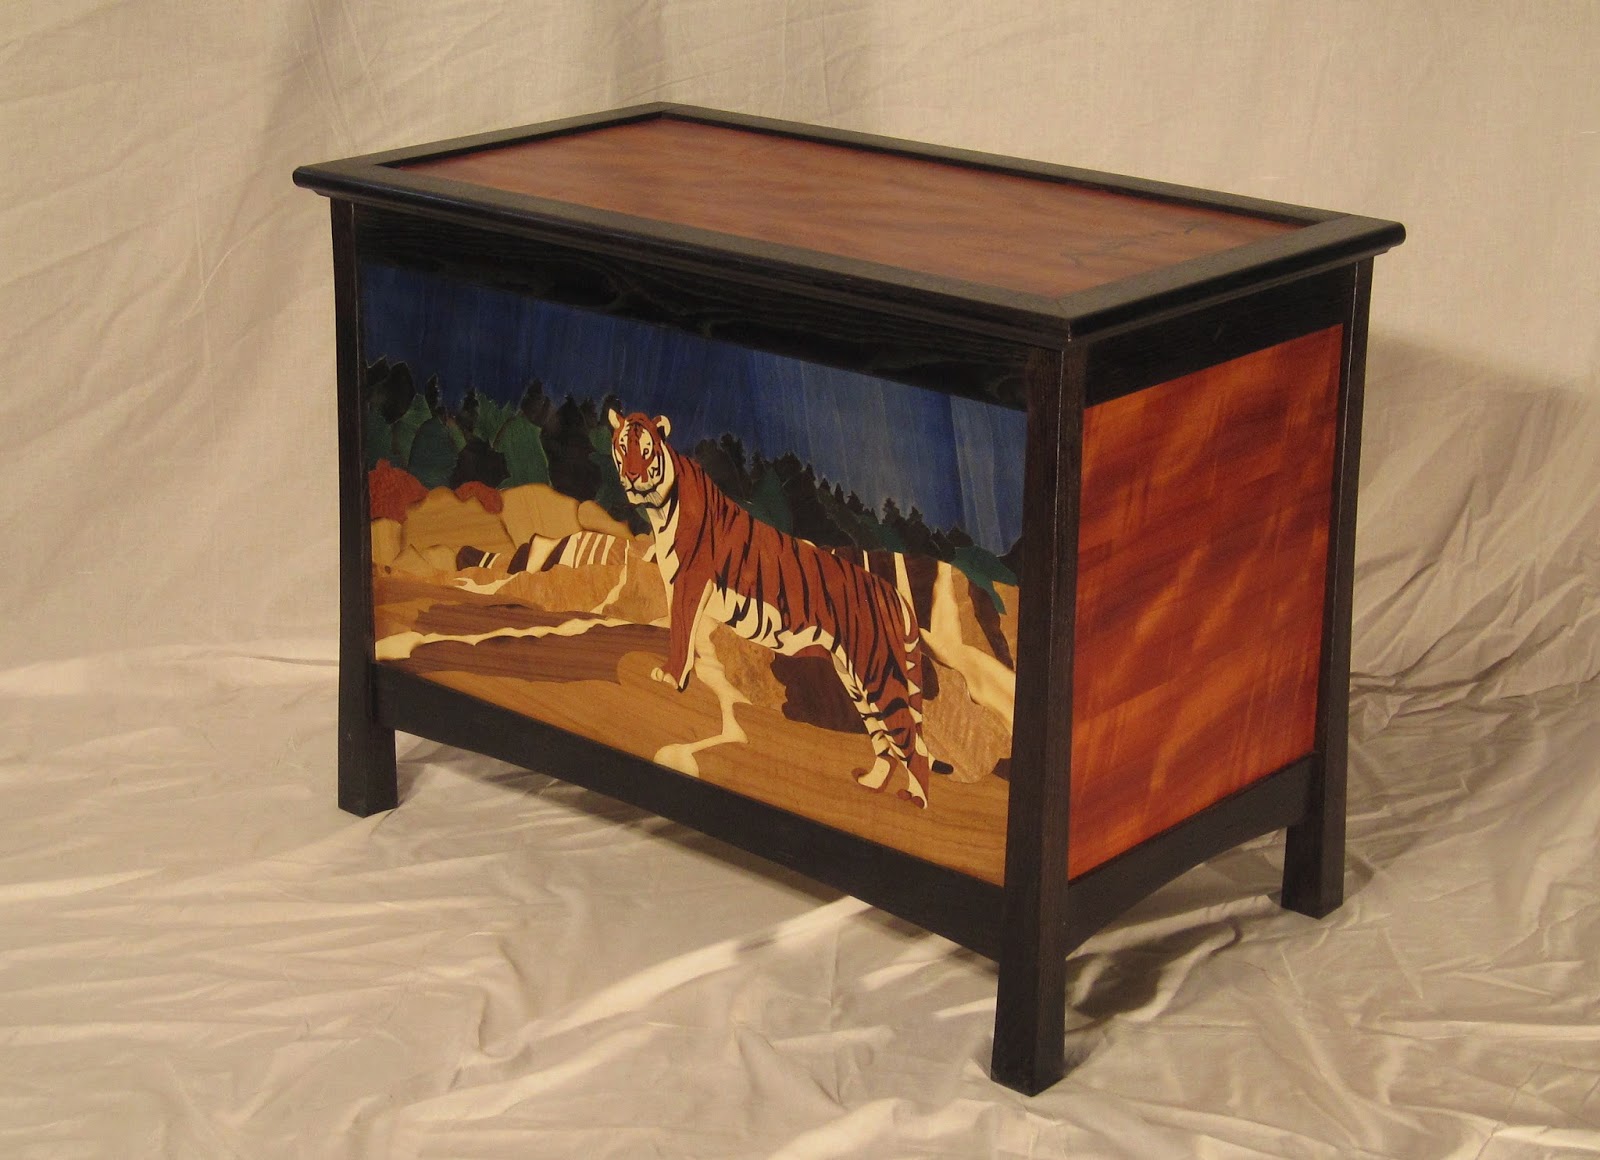
I have finally found some time to post the end results of the tiger chest I have been working on. I thought I had taken more pics of the case construction but I was mistaken. The case construction was pretty straight forward and done similar to the last blanket chest I did (June 2013.) One of the few changes I made was to use red cedar veneer on the inside of the chest so  with the solid cedar bottom the whole inside was done in cedar. The outside was done with Makore veneer.
 The panels where pretty easy to glue up using a vacuum press but the front panel did take a little bit of time to clean all the veneer tape off and get sanded.

As with the last chest I also did all the finishing before glue-up. This takes a little more effort but I think I get a much better end result also I can fix any flaws in the finish a lot easier with the parts broken down.Below is a picture of the chest during a dry run on the glue -up but before the finishing.
dry run with no frame on the lid


 I needed to dry run the chest to get an accurate measurement for the lid.


I was looking for an Asian look for this chest so I thought I would ebonize the oak frame part's with the solution made from steel wool and vinegar. I added tree bark tea (quebarcho extract) before the vinegar which gives the wood a bit more tannin, the tannin in wood mixed with metal is what makes it turn black. The process is fully explained in an article from Popular Woodworking Ebonizing Wood.
After adding the quebarcho extract

After ebonizing
side frame parts drying after vinegar, notice the different color as the top pieces where done first.
All the parts where finished with lacquer except the red cedar interior which I left unfinished. I was a little concerned about only finishing one side of a panel  but after doing some research I found it was acceptable to do if your not gluing the veneer with a glue that is susceptible to moister, as it was I used unibond 800 and it is not.
The chest was only slightly out of square when I put the clamps on it so one clamp across diagonally did the trick bringing it back to square. I used a piano hing for the top and leather to keep the lid from swinging to far back.

The lid has the characters for the Chinese proverb "Three  Men Make A Tiger".

Three men make a tiger is a Chinese proverb that refers to the idea that if an unfounded premise or urban legend is mentioned and repeated by many individuals, the premise will be erroneously accepted as the truth. This concept is analogous to communal reinforcement or the sociological concept known as argumentum ad populum (appeal to the people).
The proverb came from the story of an alleged speech by Pang Cong, an official of the state of Wei in the Warring States Period (475 BC – 221 BC) in Chinese History.
According to the Warring States Records, before he left on a trip to the state of Zhao, Pang Cong asked the King of Wei whether he would hypothetically believe in one civilian’s report that a tiger was roaming the markets in the capital city, to which the King replied no. Pang Cong asked what the King thought if two people reported the same thing, and the King said he would begin to wonder. Pang Cong then asked, “what if three people all claimed to have seen a tiger?” The King replied that he would believe in it.
Pang Cong reminded the King that the notion of a live tiger in a crowded market was absurd, yet when repeated by numerous people, it seemed real.
As a high-ranking official, Pang Cong had more than three opponents and critics; naturally, he urged the King to pay no attention to those who would spread rumors about him while he was away.
“I understand,” the King replied, and Pang Cong left for Zhao.
Yet, slanderous talk took place. When Pang Cong returned to Wei, the King stopped seeing him.


Saturday, June 14, 2014

Finishing the Tea Table

I picked up were I left off by making a pattern of the top to use for cutting out the tops and as a reference to use for the groves I will be cutting into the top. I can't tell from the original how the groves in the top were cut but I decided to cut them the same way I cut groves for inlay or stringing in something like a line and berry chest. I used a simple tool made with a pin and a pc.of card scrapper that has teeth cut into it. I think it has somewhere around a 3 5/8 inch radius.


Next I found a picture of a Lilly to use for the apron and one for the medallion in the center of the table from there I could cut the marquetry I needed for the table.The center medallion was cut using 4 veneers Holly,dyed green,dyed yellow, and the lace wood background. I stacked them into a packet and just cut all the parts from one pattern. This left me with four of every part but only one usable picture when assembled.

The lilies for the apron were cut from the same four veneers but were cut with the piece by piece method. each packet had four veneers so I had to cut each part twice to yield enough parts for six aprons, of course I ended up with eight total.The picture below shows some of the pieces before assembly.
With a little sand shading I had eight parts to pic from to use for the apron. The center medallion needed to be round so I attached it to a piece of 1/2" plywood with double stick tape and put a hole in the middle so it would spin on the pin of a piece I clamped to the table of my Shopsmith set up with a 12" disc sander. It was just a matter of bringing in the sander a little at a time while I spun the medallion until it was completely round.Worked great! I could then separate the veneer from the plywood and use the plywood as a pattern to scribe the circle on the top. This was done after the top was cut to the pattern and the groves were cut in.


 The hardest part of this project was a surprise to me. It was the supports that went between the legs. From the original picture I thought it looked very easy to do but these things are cut with compound angles and have to sit flat on the legs that are tapering in. I don't believe I did it the way the original was done but it took a lot of head scratching just to find a way to get it done at all! If the legs were off at all by the distance between them the part and angles had to be revised. The whole thing was one big headache.
One of the parts with the pattern.
This is a dry run with a scrap part to see how it would look. You can see the tape holding the parts on. I added a banding around the top and bottom of the aprons. I know the original had them on the bottom but I have no idea of what the top looked like. I may revisit the way I assembled this table but as it stands I cant think of anther way of doing it. It was finished with hand rubbed shellac and then waxed.
Here are a few photos of the finished table. I am still working on setting up a place to take proper photos of my work but these are a trial run. I am not sure if I made the legs skinny enough to match the original. It matches the sizes given for the original and I cant figure out why the original one looks so much taller also I think the original looks a little lighter in appearance but I still think its a fine looking table and I'm fine with the way it turned out.